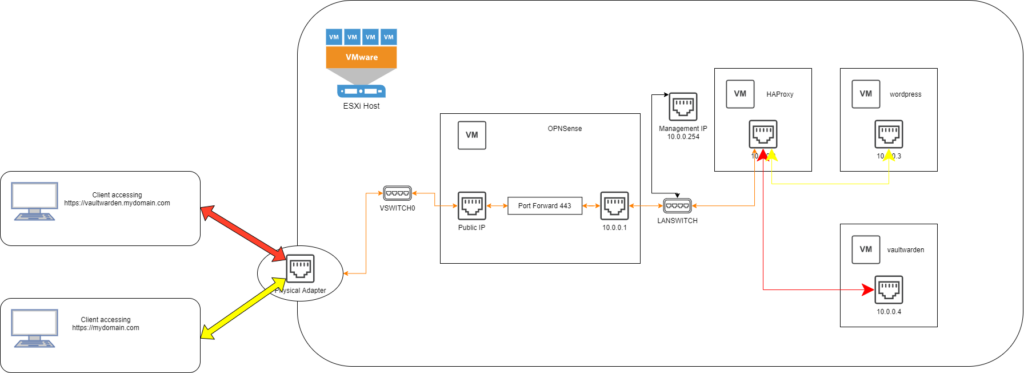
If you followed my last post about installing OPNSense on ESXi with a single ethernet adapter (On services such as Kimsufi/OVH eco), then you should have a layout very much similar to this
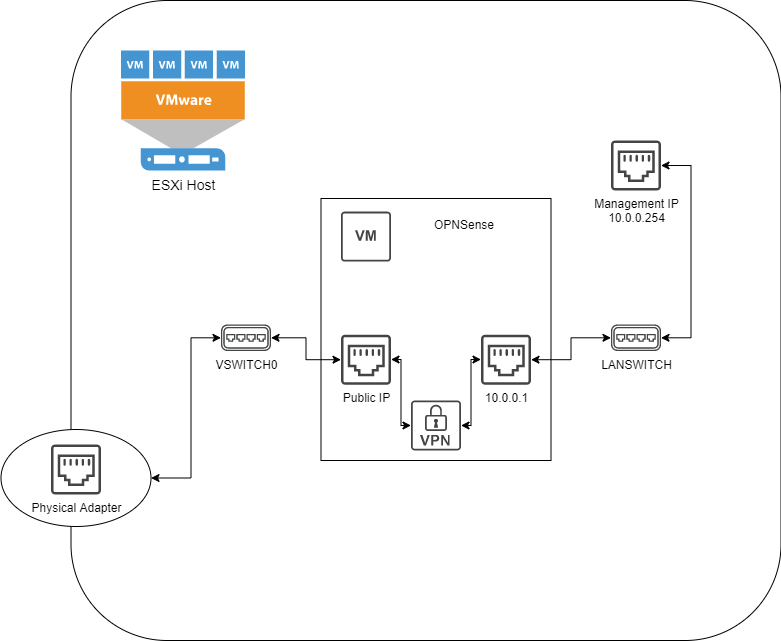
This setup blocks the public internet (via Public IP) from accessing either the management interface of ESXi, or the OPNSense Web UI, but allows you to connect via OpenVPN to manage either ESXi or OPNSense via their respective web interfaces. This is great and all, but imagine you want to use your newfound server for something…. more! Like a blog that nobody reads, or a VaultWarden instance for storing all your passwords! To do this you’ll need a couple things outside the scope of this blog: A domain name, some subdomains, and control of your DNS (In my case, afraid.org).
The basic process we will be following here is:
- Create a new VM for HAProxy
- Install Debian 11 (We should really automate this process, since we’ll be doing this for each server we want)
- Install HAProxy, install acme.sh, configure acme.sh to auto-renew a wildcard certificate with DNS validation, and ensure HAProxy points to this certificate
- Use OPNSense UI to forward port 80, and 443 to our HAProxy VM
There are two components to this: A load balancer frontend that will handle incoming connections, look at the subdomain requested, and forward to an appropriate backend, and then backend that will actually handling servicing the web requests. Assuming that you’ll want HTTPS, because this is 2022 after all, you could either terminate at the backend, or the frontend.
Terminating SSL at the backend would require you to get separate certificates for each subdomain and make sure the software running the backend is actually capable of SSL termination. This isn’t hard for one or two backends… but if we want to run more services that will never scale.
Terminating SSL at the frontend is a much more scalable option, and with the magic of wildcard certificates, you only need a single certificate to cover your entire website and any subdomains you can think up.
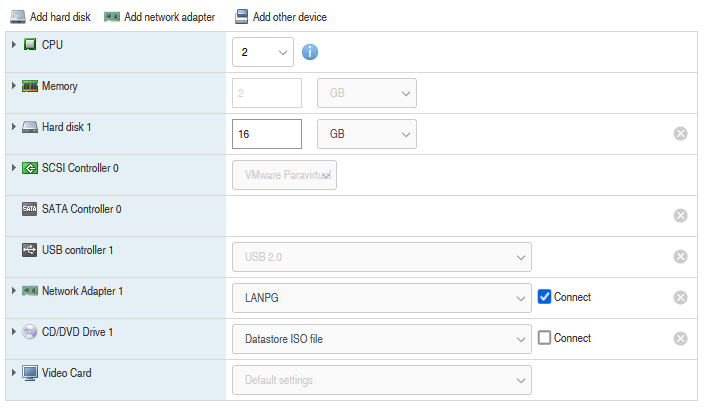
HAProxy doesn’t need a lot of horsepower behind it, so I gave it 2 vCPU, 2GB ram, and 16GB of hard drive space
apt-get install haproxy, and then edit /etc/haproxy/haproxy.confFirst step is to disable http by directing all port 80 http requests to https with a 302
frontend http_redirect
    bind *:80
    mode http
    redirect scheme https code 302
You’ll need to add a frontend configuration section for the ssl termination
frontend ssl_redirector
    bind *:443 ssl crt /etc/haproxy/ssl/cert.pem
    mode http
    http-request del-header X-Forwarded-Proto
    http-request set-header X-Forwarded-Proto https if { ssl_fc }
    acl url_vaultwarden hdr(host) -i vaultwarden.mikesshop.net
    use_backend vaultwarden if url_vaultwarden
    default_backend website_backend
This will bind to port 443, and use the cert.pem defined. This is a bundled certificate, which I’ll explain a bit later. mode is set to http for subdomain control to work, and X-Forwarded-Proto header is set to https, so the backend knows to use https on redirection links, instead of trying to redirect to http. Finally acl are haproxy’s way of setting up rules. It’s defining url_vaultwarden has a true/false condition, depending on if the incoming host is trying to access the vaultwarden subdomain or not, and then use_backend redirects the connection to the vaultwardenbackend if the acl is met, otherwise default_backend directs all other requests to website_backend
The next two blocks are for the backend, and the IPs should match your LAN ip addresses for the local machines. Assuming your wordpress backend is at 10.0.0.2 and your vaultwarden backend is at 10.0.0.3:
backend website_backend
    balance roundrobin
    mode http
    option forwardfor
    http-request add-header X-Forwarded-Proto https
    server nginx 10.0.0.3:80 check resolve-prefer ipv4
backend vaultwarden
    balance roundrobin
    mode http
    option forwardfor
    http-request add-header X-Forwarded-Proto https
    server nginx2 10.0.0.4:80 check resolve-prefer ipv4
Once you have your config set up, you should install acme.sh to manage your certificates. The process is details out on the github repo, and then the command I use to generate a cert is:
FREEDNS_User=REDACTED FREEDNS_Password=REDACTED ./acme.sh --issue --dns dns_freedns -d mikesshop.net -d *.mikesshop.net
This uses the FREEDNS_User and Password in the passed-in environment variables to log in, and set a txt record for the domain, and wildcard domain. This allows me to have a single certificate for the main website, and for every single subdomain. This will produce a bunch of cert files, the one you want to copy into your /etc/haproxy/ssl/cert.pem is the fullchain.cer. That contains the full chain of certificates that you’ll need to use.
Once the cert is copied, you’ll need to forward the appropriate ports from your OPNSense box, to the HAProxy VM for routing.
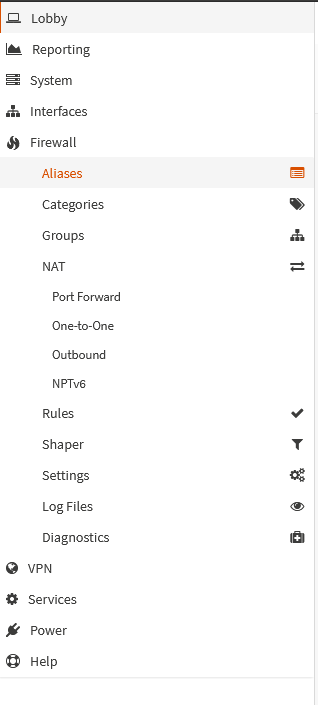
From the OPNSense main dashboard, you’ll want to select Firewall->Nat->Port Forward
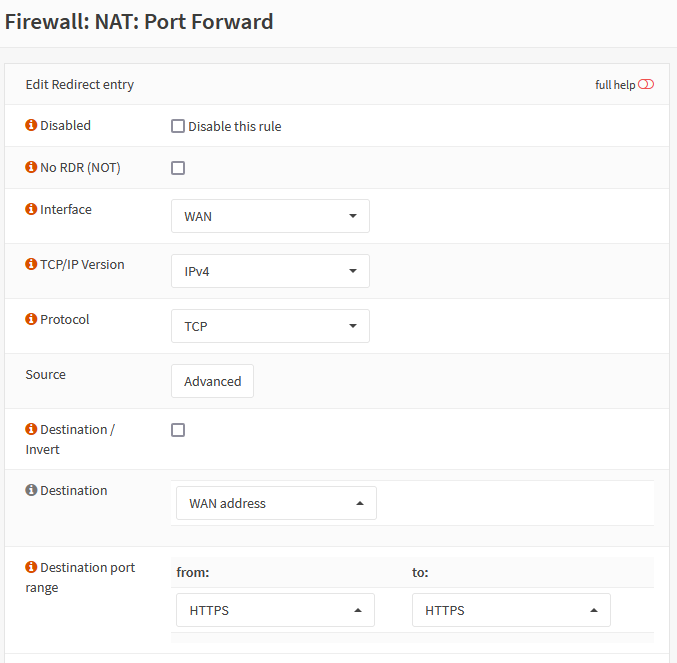
Then click on the orange + button to add a new port forwarding rule

The important bits are:
Interface to WAN, Protocol to TCP, Destination WAN address,
- Interface: WAN
- Protocol: TCP
- Destination: WAN address
- Destination Port range: HTTP/HTTP
- Redirect Target IP: The IP address you assigned HAProxy, in my case 10.0.0.2
- Redirect Target Port: HTTP
It is also helpful to put in a description, so you can easily discern what this rule is from the overview screen.


Then click save, and create another rule for HTTPS (Port 443). Again, the important bits:
- Interface: WAN
- Protocol: TCP
- Destination: WAN address
- Destination Port range: HTTPS/HTTPS
- Redirect Target IP: The IP address you assigned HAProxy, in my case 10.0.0.2
- Redirect Target Port: HTTPS
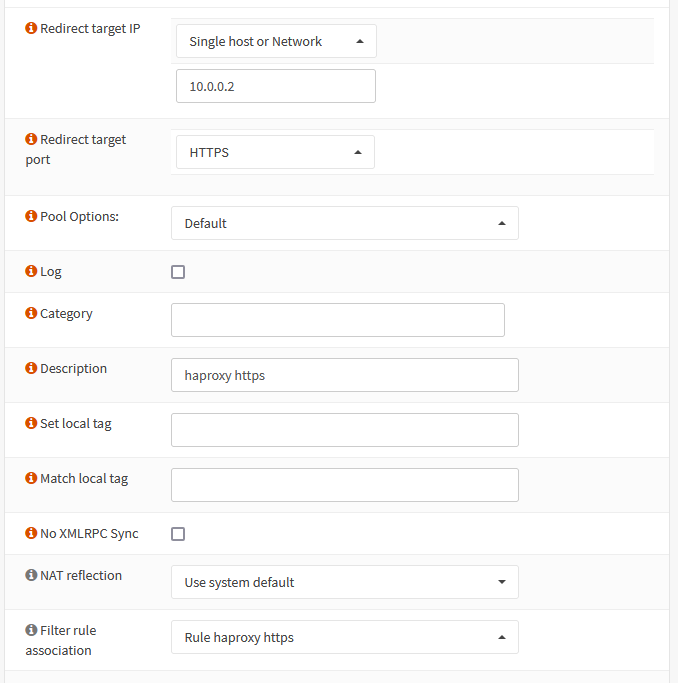
Once this is complete, click Save, and then BE SURE TO CLICK APPLY CHANGES at the top of the screen, otherwise these changes won’t take effect until the next reboot of OPNSense.
At this point, you should be able to add the vaultwarden and wordpress subdomains to your DNS, and access them via your web browser. Any access to HTTP on port 80 should automatically redirect to port 443 with the appropriate certificate in place, and each subdomain should go to the correct place!
Let me know if you have any issues with this setup, or find any mistakes. This has mostly been to help me remember how to do this the next time I go to set this up, rather than spending many hours trying to remember on my own but I’d love to hear if this helped someone!